Servicing the Bottom Bracket
The bottom bracket is the dohickey that connects your two crank-arms together, and secures them within the bottom of the bike frame.The bottom bracket has threads around the outside that secure it into the hole in the frame. Inside, bearings surround a rotating spindle -- this lets the pedals turn free from the frame. Each side of the spindle has a mechanism to connect your crank. This may be square tapered bolts, a toothed ring (splined bottom bracket), or even a threaded bolt. The bottom bracket type must match the crank type (a crank with a square hole must be mounted on a BB with the square receiver).
Bottom brackets also come in different widths, and with different spindle widths: the bracket width should match the frame, and the spindle width should put the cranks out away from the frame, and allow the front derailleur to transfer the chain onto the smallest ring without hitting the bike frame. The BB will usually have its size printed on the cartridge, but you have to take it out to read the numbers. For example, a 68x116 bottom bracket is 68 mm wide as it fits into the frame, and the spindles are 116 mm apart. If you wanted the pedals a bit closer together, you might buy a 68x112.5 BB.
Sealed Bottom Bracket: If your bottom bracket is a sealed cartridge unit (as most are nowadays), it can't be serviced or adjusted. If it grinds, wobbles, or catches, it must be replaced as a unit. Just remove the old cartridge and replace the entire thing.
Take the chain off the chainrings, and lay it on the frame next to the bottom bracket. With the bike clamped in a workstand, shove the base of the crank-arms side-to-side to detect motion in the bottom bracket. Now try to pull the cranks away from, then back towards the bike to detect wobble. Turn the crank and listen for noises within the bottom bracket. These tests will help you identify a damaged bottom bracket.
To replace the bottom bracket, you have to do some major stripping! You must remove both the left crank and the right crank arm plus chainrings. See the crank section for additional information.

You may need to use a crank puller to remove the cranks. This tool extracts the crank off the spindle without damaging the bottom bracket. Older bikes with a square bottom bracket spindle need these to pull the crank out and away from the spindle.


It may be easiest to remove the bottom bracket with the bike lying on its side, and if so take it out of your workstand for this part.
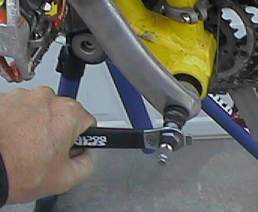
Begin by removing the lockring. On some Shimano cartridge BBs, the lockring is on the left-hand side, opposite the chain. Turn counterclockwise. You may need to apply solvent. If the wrench won't turn, have someone tap the bottom bracket tool gently with a hammer as you apply force.


After removing the lockring, flip the bike over, and take out the bottom bracket. Use the same bracket tool and wrench. NOTE: the bottom bracket unscrews in the opposite direction. Turn it clockwise.
Clean the threads on the inside of the bracket housing, and clean the threads on the lockring.


Thread in the lockring. Leave it slightly loose. Now flip the bike back over to expose the other side.
Insert the new bottom bracket, and screw it in until it's tight. Snug up the lockring. Now reattach the cranks.
NOTE: Remove the chain-side crank before turning the bottom bracket! In this photo, the chain-wheel is still lying loosely on the bracket spindle.

Adjustable Bottom Bracket: In standard old bottom brackets, the bearings can be serviced and adjusted. In others, the unit is sealed, so the bottom bracket must be replaced if it misbehaves in any way. To replace or service the bottom bracket, you need a set of "bottom bracket tools," consisting of a lockring tool and a pin wrench to immobilize the bearing cup.
Looseness of the bottom bracket is detected by a subtle "floppiness" of the cranks as you apply inward or outward pressure on the end of the crank-arm. If it's a standard bottom bracket, you can adjust the bearing tightness.
Adjusting the bearing tightness: First remove the left crank from the spindle. You may need a crank extractor tool. Apply a lockring removing tool to the notches on the lockring and twist about 1/2 turn to loosen it. Now adjust the bearing cup -- turn it slightly counterclockwise to loosen the bearings, clockwise to tighten. While keeping the bearing cup immobilized with the pin wrench, tighten the lockring.
Removing the bottom bracket, standard bearings: Remove both left and right cranks from the spindle. You may need a crank extractor tool. Loosen and remove the lockring from the left side. (Since you are removing a standard -- non-sealed -- set of bearings, place a cloth under the bike to catch any loose bearings. Now apply the pin wrench to the bearing cups and turn counterclockwise until the cup and bearings are removed. Pull the spindle out from the right side and catch the bearings there also.)
Servicing the bearings: Clean and inspect all parts. Replace any parts that are damaged or corroded. Pack both bearing cups with bearing grease. Push the bearings into the grease. Put the bearing retainer rings into the cups, making sure that only the balls (and not the retainer) contacts the cup. If the fixed bearing cup was removed, reinstall it, turning counterclockwise. Insert the spindle from the left side. Now put in the adjustable bearing cup (on the left) and adjust the tightness so the spindle turns smoothly without wobbling. Tighten the lockring down while restraining the bearing cup with a pin wrench.


